Doctor's Orders tab allows users to create, manage, view, and discontinue regular and eRx orders, log vitals, and fax orders to the pharmacy.
All users can view the Doctor’s Orders tab, but some sections are restricted to certain users, which will be detailed in the relevant sections.
Before we get started, here are a few icons and actions that can help you navigate this page:
- ← Patients will redirect you back to the main Patients/Clients page (also known as the Patients tab).
-
Expand and Lock icons: Clicking on the expand arrows open the Doctor’s Orders section to full screen, and the lock icon locks it in that state. These features allow you to lock the page, such that you cannot navigate to other tabs while still performing functions on the Doctor’s Orders tab. To unlock the window again, click on the lock icon and enter your password or pin.
Please Note: We recommend completing the exercise below in Fullscreen by clicking on the icon on the top right corner.
Integrated Assessments
Required Roles: Integrated Assessments can only be logged by Super Admins, Record Admins, Doctors, Nurses, and Techs.
From the Med Log, you can document key integrated assessments including:
Not seeing an assessment in your environment? Check out this article for help setting up integrated assessments.
All Orders
Patient's orders can be viewed in two modes:
-
Current Orders: This is the default view and contains all orders which are currently active (open-ended or with a future end-dates) or which have been discontinued but not yet reviewed by the physician.

-
All Orders: The All Orders view contain all orders ever prescribed to the patient during this episode of care, grouped by start dates.

- If the medication you enter is a controlled substance, it will have a controlled substance label.
- C-I: These drugs have a high potential for abuse. No medical uses for treatment.
- C-II: High potential for abuse. Has accepted medical use for treatment.
- C-III: Less abuse potential than C-II drugs. Accepted medical use.
- C-IV: Less abuse potential than C-III drugs. Accepted medical use.
-
C-V: Less abuse potential than C-IV drugs. Accepted medical use.
Click on the Show All Orders/Show Current Orders buttons to switch between views.
In both modes, orders can be sorted by order name, start/stop date, and status. You can also use the search bar to search by any visible text on this page, including doses, warning, and doctor's name.
-
Orders can also be individually reviewed from the Doctor’s Orders tab
of a patient's chart by selecting Nurse Reviewed.
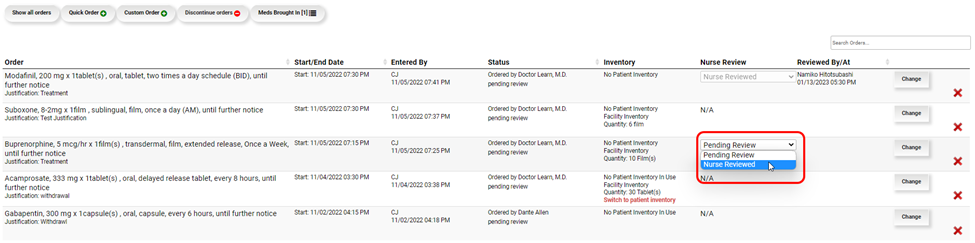
-
Once confirmed, the Nurse Review Status will now be grayed out and say
Nurse Reviewed, while the name of the reviewer and the date and time
will appear in the Reviewed By/At column. Click here
to learn more about Dashboard Nurse Review.

 Change
Active Orders
Change
Active Orders
Any active order can be changed after it has been created.
- To change an order from the Doctor’s Orders tab, click on the Change button.
- Next, the Change Order screen will appear.
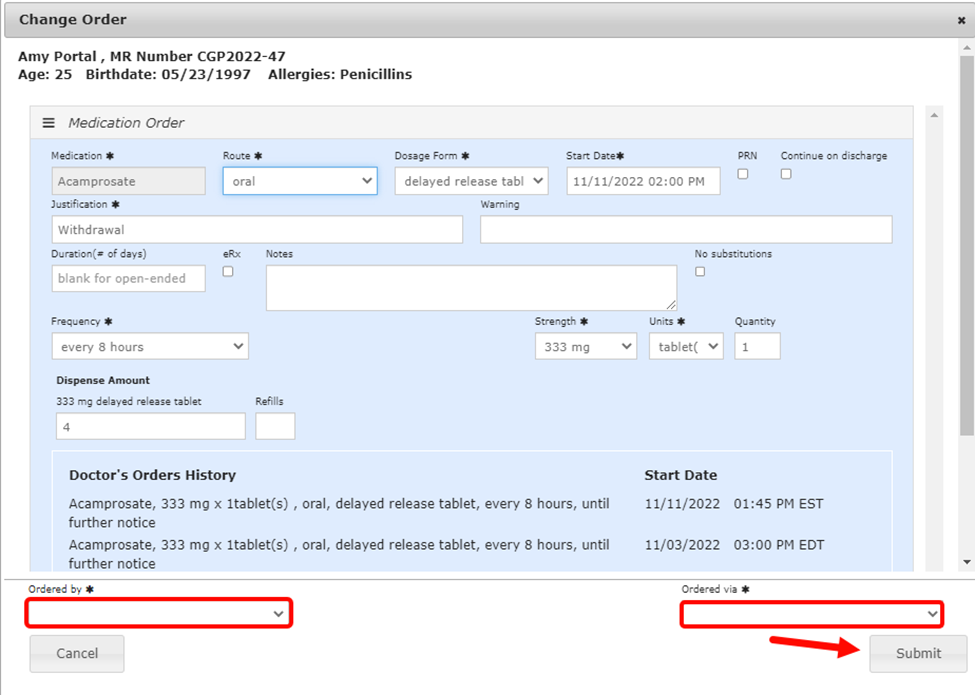
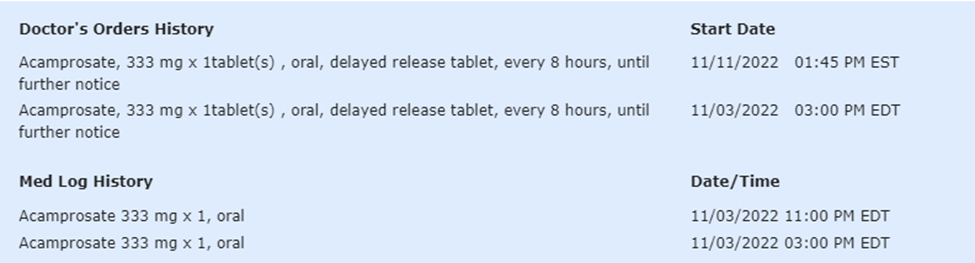
- In addition to the usual order fields, the Change Order screen includes a Doctor’s Orders and Med Log History.
- Once you made the necessary changes (being sure enter Ordered By and Via information if you are not the prescribing physician), click Submit. The original order will be discontinued and a new order is created from the changes you made.
Keep the following things in mind when it comes to changing orders:
- Medication Orders: For medications, you can modify any detail except for the medication itself.
- Action Orders: You can modify any fields.
- Taper Orders: Medication, start type, past and observed/administered doses cannot be modified. You can only modify future doses.
- All fields indicated with an asterisk (*) are required.
Quick and Custom Orders
Users with Nurse, Doctor, Records Admin, and Super Admin permissions can create both quick and custom orders from the Doctor’s Orders tab.
Click here to learn more about Quick Orders and here to learn more about Custom Orders.
Important: Check out this article for specific instructions on creating eRx orders in the EMR.
Discontinue Orders
There are two ways for nurses, doctors, records admins, and super admins to discontinue an existing order from the Doctor’s Orders tab.
Please Note: We recommend completing the exercise below in in Fullscreen by clicking the icon on the top right corner of the exercise.
Multiple Orders
To discontinue multiple orders at once, use the following instructions.
- From the Doctor's Order tab, click on the Discontinue Orders button.
- You will be taken to the following pop-up screen.
- Important: If you are a doctor, these options will be hidden, as you are assumed to be the person issuing the order.
- Pick the orders you wish to discontinue. Selected orders will appear highlighted in green.
- If you wish to add a reason for discontinuation, type it into the Discontinue Reason field.
- Select the name of the doctor who issued the instruction by clicking on the Ordered By field and choosing their name from the drop-down list. Then choose the method by which the order was communicated by clicking on the Via field and selecting the correct method from the list.
- Finally, click on the Discontinue Selected Orders or Submit buttons.
Individual Orders
If you wish to discontinue an individual order, follow these steps.
- Click on the order you wish to discontinue.
- If desired, click on the Annotate button to add an annotation. Otherwise, click either Discontinue button.
- In the Discontinue Order By window, fill out the following information.

- If you wish to add a reason for discontinuation, type it into the Discontinue Reason field.
- Select the name of the doctor who issued the instruction by clicking on the Ordered By field and choosing their name from the drop-down list. Then choose the method by which the order was communicated by clicking on the Via field and selecting the correct method from the list.
- Important: If you are a doctor, these options will be hidden, as you are assumed to be the person issuing the order.
- Finally, click on the Submit button.
You can easily identify discontinued orders in the Order list, as text of the Order field will be red, and the order name will begin with STOP. Additionally, there will be red text in the Start/End Date field indicating the date and time that the order was discontinued.
If you click on an order, you will see the red Discontinued stamp, which includes the date and time of the discontinuation.
Continue on Discharge
You can mark individual or multiple orders to be continued upon discharge. For existing orders, use the following instructions.
- To begin, click Continue on Discharge.
- From the Continue on Discharge window you can select one or more medications that the patient should continue taking after they are discharged. Selected medications will be indicated in green.
- Orders marked as Continued on Discharge display as such in order details.
Fax to Pharmacy
If your facility is using Kipu's Fax to Pharmacy feature, users with the Manage Pharmacy Orders permission can send faxes to selected pharmacies from the Doctor's Orders tab by clicking on the Fax to Pharmacy button.
For a detailed walk-through, including information on set-up and permissions, check out the Fax to Pharmacy article.
Meds Brought In
If a patient brings medications with them when they enter your facility, you can document them via the Meds Brought In feature.
For detailed instructions and further information, see our article on Medications Brought In.
Sign Orders
Users with Doctor role can sign off on all of the chosen patient’s orders in the Doctor’s Orders tab by clicking on the Sign Orders button.
They can also sign individual orders by clicking on the order's name.
If the order is pending review, click on the Review Signature button and sign your name.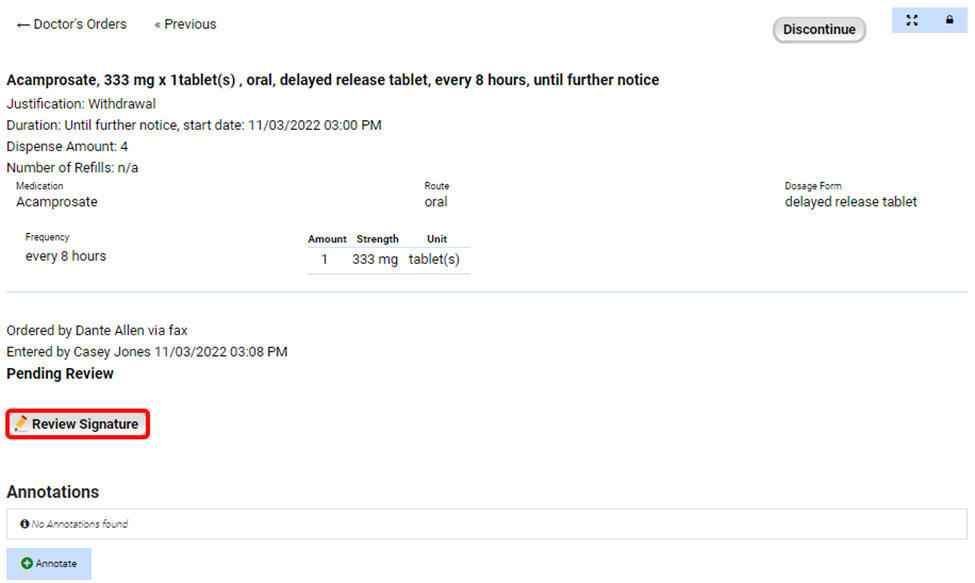
If the order is discontinued, the signature button will instead say Discontinue Review Signature.
eRx Portal and eRx Submit
If your facility is using the eRx feature Kipu offers for electronic prescriptions, the Doctor's Orders tab allows designated users (Providers, Provider Agents, and Proxies only) to manage orders through the eRx Portal.
- To access the portal, click on the eRx Portal button.

- From the Portal, you can view ordered eRx prescriptions (if you are a proxy) and send them (if you are a prescriber or prescribing agent).
- Additionally, if you have created a regular medication order and need to turn it into an eRx order, you can do that from the Doctor’s Orders tab by clicking on the eRx Submit button.

- Once you do so, you will see the following notice, and there will be an eRx tag highlighted in yellow.
- Refresh the page and the tag will turn green, indicating that the order has been successfully submitted.

- If the order is not successfully submitted, you would see a warning box, and the tag will be red. Click on the Change button and make the necessary changes, then resubmit.
Important: Only compatible medication orders with authorized providers assigned can be transferred to eRx.
Comments
0 comments
Article is closed for comments.