Let's review how to report on your text messages, their delivery status, and get an estimate of total cost related to this functionality.
Important: Please contact Support to have this dashboard enabled.
- To reach the Kipu BI tab, click on the Reports tab, then Kipu BI.
- Then select Scheduler Communication Report.
General Controls
Below the tabs that include the Operations, Billing, and other options, you will find several icons.
-
Control updates:
- The circular arrow refreshes the data, while the back and forward arrows undo and redo changes respectively.
- If you click on the icon of a down arrow in a box, you will access the following drop-down list.
- Use the options provided to print the current tab or download it as a PDF file. Clicking View downloads will allow you to view all downloads created from that tab previously, and to download them again.
- You can hover over each widget to access the two indicated icons.
- Click on the two arrows to expand the widget to full screen
- Click on the three vertical dots to view summary data or export the information in the widget to CSV and/or Excel, etc..
- Hovering over widgets with charts, graphs, and other visual elements will display additional information.
-
Each section has Controls, which have different defaults and purposes. However, the mechanics of each section are similar. To access the controls for each tab, simply click anywhere on the controls row.
-
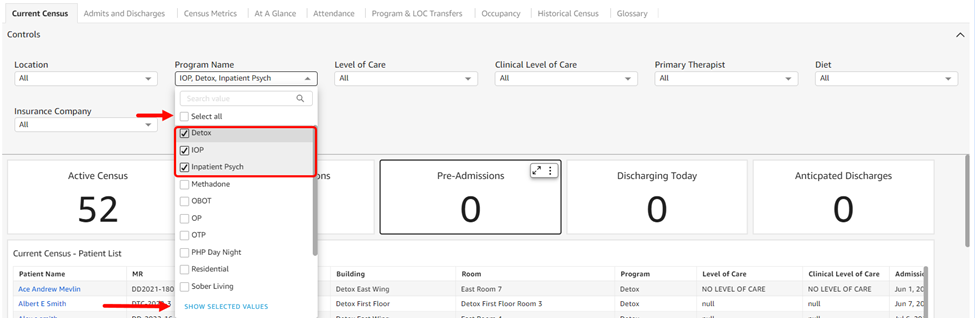
Most drop-downs contain a series of options and many default to selecting all. You can choose specific items by unchecking the Select All option and then checking off each item individually. If you click the Show Selected Values option at the bottom of the list, you will only see the items you selected.
- If you hover over each drop-down, three dots appear, allowing you to access the Reset and Refresh options.
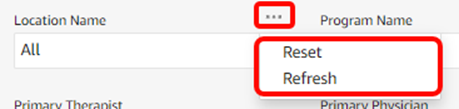
- The circular arrow refreshes the data, while the back and forward arrows undo and redo changes respectively.
Scheduler Communication Report
The Controls level allows you to filter your data by key dimensions and set a date range.
-
Controls default to All.
- Location Name: Locations match the locations found in the instance banner drop-down and are listed in alphabetical order.
- MR: Filter results by MR number. This field can be searched and defaults to All.
- Appointment Type (multi-select drop-down with checkboxes): Appointment Type options are listed in alphabetical order and default to All.
- Status: Filter by status (delivered, failed, all)
- Receiver Type: Use this option to filter messages received by patient, resource, or all.
- Sender: Filter by the sender's phone number or email. This filter defaults to All.
-
Created at UTC: Filter by creation date in current universal time (UTC).
- Important: Previous year, previous month, and current month KPIs will not update upon modification of the date range because they are hardcoded. Additionally, if you enter a manual date range, note that data from the end date will not be included (if you want reports on data from 1/1/2025-1/31/2025 you would enter 1/1/25-2/1/25 and the data from 2/1 won't be included in the report).
- In this report, you can:
- View all messages sent and their related status.
- View a chart that displays a count of all billable messages (both delivered and failed).
- View a chart that displays text message count by status (Delivered or Failed).
- The Estimated Cost of Messages tile multiplies the total number of sent messages by $.02 to get the calculated value. Note this may vary from what you see on your invoice based on the date range of this report.
- View all messages sent and their related status.
Comments
0 comments
Article is closed for comments.