Order Templates are used in the Medication section of Quick Orders, and at least one template must be created before Quick Orders can be used. You can also add medication orders to protocols, which allow you to bundle medication orders and action orders together to create a series of instructions that can be assigned to a patient in one click.
Required Permissions: Only Super Admins and users with the Manage Templates or Manage Templates - Orders permissions can access and create templates.
- To start, click Templates > Orders > Medication Orders.
- The Medication Orders tab shows all created medication order templates. You can create new templates or use the filtering options to view and edit existing templates.
- Type the name of the medication here to search by medication then select the correct option from the drop-down.
- Choose the correct controlled substance category (c-i through v) from the drop-down
- Set the toggle to OR to filter by templates that use the OR condition or to AND to filter by templates that use the AND condition.
Creating A Medication Order Template
- To create a new order, click on the New Order button to begin.
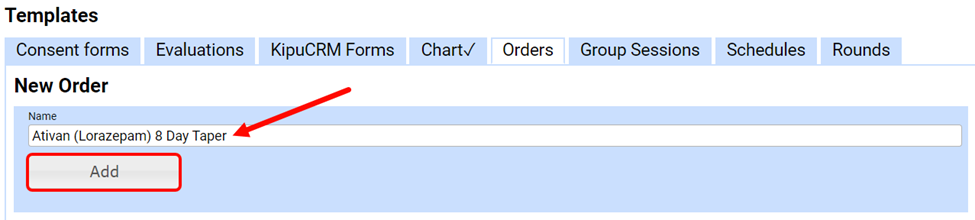
- In the New Order form, enter the order name in the Name field and click on the Add button.
- Important: Kipu recommends the following convention for naming your Quick Order templates to avoid confusion and misuse.
Standard Medication: Medication Name Generic (Commercial), total dose, route, frequency, duration (if applicable), justification. (e.g., Gabapentin 300mg, oral, once a day in the morning for 10 days, for seizure precaution)
PRN Medication: Medication Name Generic (Commercial if no longer available), total dose, route, frequency, duration (if applicable) as needed, justification (e.g., Ativan 2mg, oral, every 4 hours for 3 days, as needed for signs and symptoms of withdrawal)
Taper: Medication Name Generic (Commercial if no longer available), duration, taper, any additional specific details for the taper (e.g., Buprenorphine (Subutex) 4 Day Taper)
- Important: Kipu recommends the following convention for naming your Quick Order templates to avoid confusion and misuse.
- If you are in a master instance, select your desired location(s) or select all. Otherwise, skip straight to the next step.

- Fill out the next section of the form. Keep in mind that all fields with asterisks (*) are required.
- PRN (only 1 frequency): Allows the medication to be prescribed on the created schedule, or as needed. You can modify the time, strength, and quantity for each dose.
- Justification*: Enter the justification for the medication order.
- Warnings: If desired, enter any warnings.
-
Dosage Type*: Choose the desired dosage type.
- Open Ended: The medication order will continue until stopped with no set end date.
-
Taper/Titration: If you are creating a taper or titration, the Frequency field will become Day 1: Frequency, and the Add Day + option will appear. Click on the Add Day + button to add a day. Modify individual doses as desired (decreasing in doses for tapers, and increasing for titrations) and click on the trash can icon on the right if you need to delete a day. We recommend using scheduled frequencies for tapers (e.g., three times a day instead of every eight hours) where possible.
- Consistent Dose: The medication order remains the same over a set number of days (requires a set duration in days.
- Duration in Days: Required if the Dosage Type selected is Taper or Consistent Dose.
- Enabled: In order for the order template to be activated, and available for use, this checkbox must be checked prior to validation.
-
Medication*: Begin typing in the name of the desired medication, and then select the correct option from the drop-down menu. It is extremely important that you select the medication from the drop-down to ensure that allergy notifications, drug interaction warnings, and other such features can function correctly.
-
Route*: Once the medication is entered, a drop-down will appear in the Rout field based on the medication chosen. It will match the selection by default, but you can select the method of delivery from the option. Click on an option from the drop-down.
- Dosage Form*: Once you have set both medication and rout, select an option from the Dosage Form drop-down. Once again, if you do not see the option you want, select Custom from the drop-down and choose the alternate method.
-
Frequency*: Click on the Frequency drop-down to choose how frequently the medication is administered. Once you select a frequency, additional fields will appear based on your selection. Keep in mind that frequencies are not filtered out by location. If you select a frequency that is only available for one of your available locations in the template, when you use the order template in a different location, you will have to manually select a frequency.
- At: Use the hour and minute drop-downs to determine when a dose is scheduled.
-
Strength*: Enter the strength of the medication by selecting it from the drop-down.
- Important: If you choose to use a custom strength in the Strength field, you will need to include both the number value and the unit of measure (e.g.,10 mg not simply 10) or you will encounter an error message and be unable to proceed.
-
Units*: Enter units by selecting it from the drop-down.
- Important: If you are ordering an Insulin product, this field will default to units.
-
Quantity: Enter the desired quantity. If you need to indicate that the medication has a variable dose range you can select the different quantity options. In the image below the patient could take one 2 mg tablet or two 2 mg tablets so both 1 and 2 are selected.
-
Add Max Daily Dose: You can also set a max daily dose amount by clicking on the carrot, typing in the maximum quantity and selecting choosing the correct option from the drop-down. Once the selected maximum quantity is reached within a 24 hour period, further doses will not be available in the MAR.
- If you do not wish to allow substitutions, click on the No Substitutions checkbox.
- Add any notes, if necessary.
- Amount to Dispense is automatically calculated based on your frequencies and number of days (if applicable). If you need to alter the automatic calculation to be dispensed, click on the pencil icon, but do note that if you make changes to this area, the Amount to Dispense will no longer automatically calculate.
- Enter any desired refills in the Refills field.
- Once your information is complete, click the Save or Validate for eRx buttons.
- Important: If you are creating eRx orders, be sure that you only use the Validate for eRx button. Use the Save button only if you are not creating an eRx order.
- If all of the information is entered correctly, when validation completes, a message will appear at the top of the page.

Doctor Orders Improved Dispense Amount
If your facility has enabled the Enable Doctor Orders Improved Dispense Amount setting under Settings > Instance when a template is created with an open ended dosage type the Amount to Dispense can be left to automatically calculate.
- However, if you have medications with multiple available packaging fields, you can click on the edit pencil.
- Then acknowledge that overriding the dispense amount will prevent the template from automatically calculating.
- Select the desired package from the Quantity drop-down and add the desired days supply amounts.
- Alternatively, you can enter a manual quantity.
Comments
0 comments
Article is closed for comments.