Performing patient safety assessments and checks involves enrolling patients in scheduled intervals based on their assessed risk and your facility protocols. This includes documenting vital signs, logging valuables, and completing necessary assessments using standardized forms. Schedule follow-up appointments, confirm emergency contact information, and use flags for urgent follow-ups if needed. For telehealth facilities, similar assessments are conducted, with additional steps for scheduling and notifying patients about appointments and referrals.
Note: This process only describes the admissions process for clients not using a CRM or integrated RCM platform.
Best Practice Workflow Video
Workflow 1: In-Patient Facilities
Let’s review the best practices for performing a patient safety assessment and check in the Kipu EMR. In-patient facilities usually enroll patients in specified round intervals based on a suicidal ideation assessment and the facility’s state requirements.
-
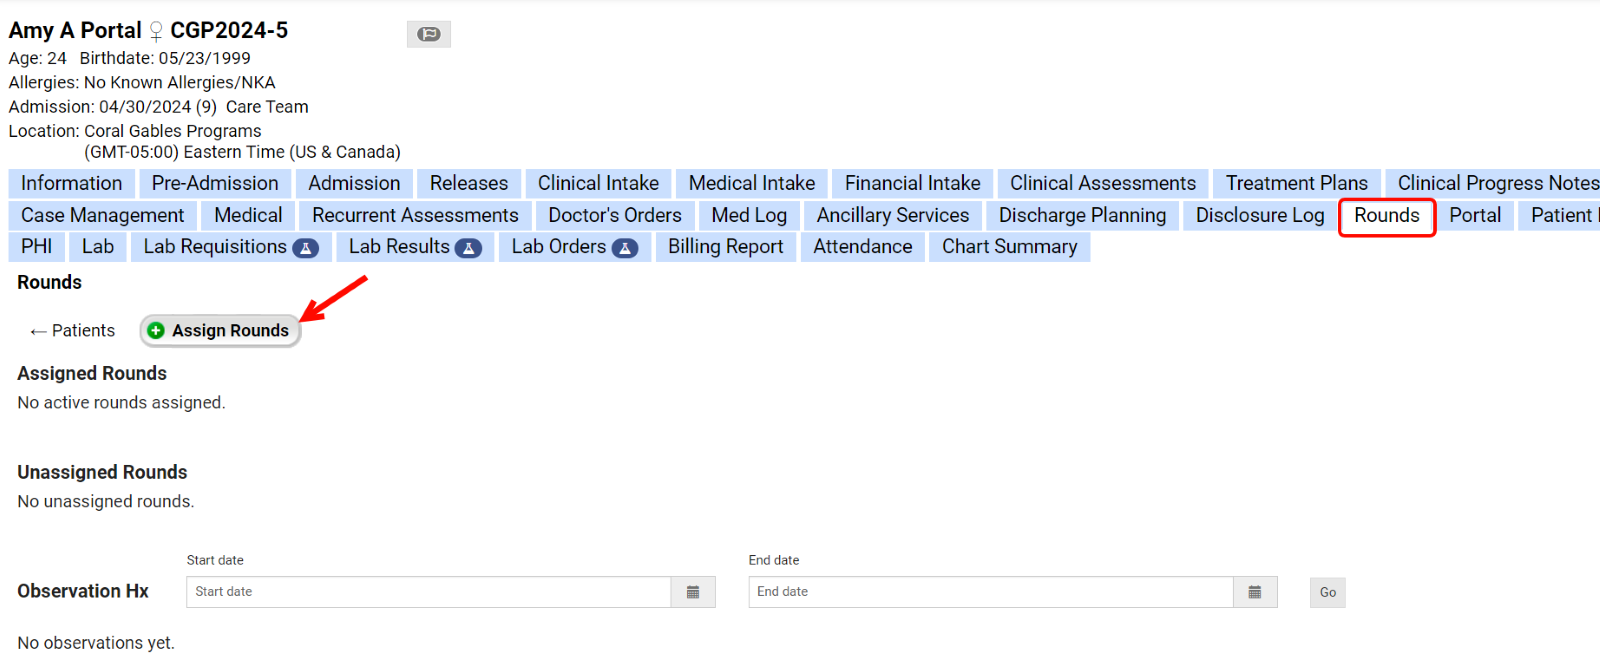
Enrolling in Round Intervals: Enroll the patient in a round interval using the Intake Evaluation. Alternatively, you can also enroll the patient by selecting the Rounds tab.
- Click on the Assign Rounds button.
- Click on one or more rounds to assign them to the patient and click Submit. Selected rounds will be highlighted in green.
- Note: Follow your facility protocols and state requirements to assign round intervals. Most round intervals are set at 15 minutes, 30 minutes, or 60 minutes. Bed checks or observation checks can be subject to review by state and other regulatory auditors. Eating disorder facility checks are usually completed during mealtimes. For more information on adding rounds, click here.
- Click on the Assign Rounds button.
-
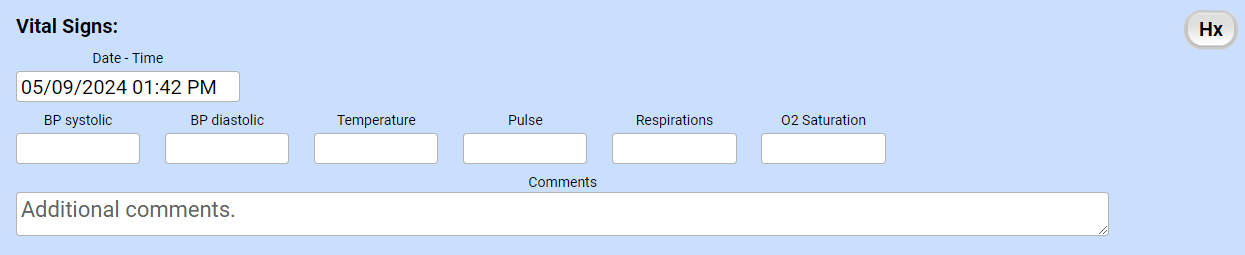
Logging Vitals: Log the patient’s vitals using any of these options depending on your facility’s workflow:
-
Option 1: Enter vital signs in an intake evaluation form.
-
Option 2: Enter vital signs on the Doctor’s Orders or Med Log tab. Click here to learn more about integrated assessments for vital signs.
-
Option 3: You can record vital signs during rounds depending on your facility workflow and configuration. Click here to learn more about how to manage rounds.
-
Option 1: Enter vital signs in an intake evaluation form.
-
Belongings Log: Add the Belongings Log from the centralized documentation icon.
- Log the patient’s valuables, paraphernalia, or substances found by a tech or nurse during the body search based on your facility protocols within the log.
- Log the patient’s valuables, paraphernalia, or substances found by a tech or nurse during the body search based on your facility protocols within the log.
-
Logging and Destroying Substances: If substances need to be destroyed, go to the Doctor’s Order tab and select Meds Brought In to log medications, paraphernalia, and substances the patient brought to the facility. For more information about Meds Brought In by Patient workflow, click here.
- Once you log the meds brought in, select the Destroy option from the Action Taken drop-down list for substances that need to be destroyed.
- Once you log the meds brought in, select the Destroy option from the Action Taken drop-down list for substances that need to be destroyed.
-
Suicide Ideation Assessment: Add the Suicide Ideation Assessment evaluation from the centralized documentation icon for the clinician to complete. The Columbia Suicide Risk Assessment is the most widely accepted standard.
- Some facilities have a shortened form filled out by techs or nurses that pre-populates into the larger Columbia Suicide Risk Assessment based on facility and/or state protocols and other regulatory auditors
- Some facilities have a shortened form filled out by techs or nurses that pre-populates into the larger Columbia Suicide Risk Assessment based on facility and/or state protocols and other regulatory auditors
-
Safety Plan: Add the Stanley-Brown Safety Plan from the centralized documentation icon, which provides resources and guidance for making patients feel safe.
-
Infection Control and Informational Fact Sheets: Add the Universal Precautions for Infection Control consent form and the HIV/AIDS/TB/STD Informational Fact Sheet depending on your facility protocols.
-
Safe Call to Emergency Contact: Go to the patient’s facesheet to locate their contacts. Make sure the release of information form has been signed and has not been revoked.
- Facilities usually call the emergency contact to confirm the patient’s arrival after validating the release of information. Click here to learn more about adding and revoking the release of information for patient contacts.
-
From the patient chart, click on the New Document icon to search for and add the Safe Call evaluation form.
-
If a patient arrives outside of standard business hours, the intake staff can create a flag on the patient chart until the Safe Call can be completed. For more information on patient flags, click here.
-
Scheduling Follow-Up Appointments: Schedule a follow-up appointment as needed with a resource. Click here for more information on adding appointments to the Scheduler.
-
Referrals and Urgent Flags: If your facility cannot provide services to the patient, click here to learn more about referring the patient to a higher level of care.
-
You can add an urgent flag to the chart to notify all users that a follow-up or referral is needed. The flag is resolved once the risk has been mitigated and the client is safe or discharged to a higher level of care. Click here to learn more about adding a flag.
-


Workflow Two: Outpatient (Telehealth) Facilities
Let’s review the best practices for performing an outpatient admission for telehealth facilities in the Kipu EMR.
-
Suicide Ideation Assessment: Add the Suicide Ideation Assessment evaluation from the centralized documentation icon for the clinician to complete. The Columbia Suicide Risk Assessment is the most widely accepted standard.
- Some facilities have a shortened form filled out by techs or nurses that pre-populates into the larger Columbia Suicide Risk Assessment based on facility and/or state protocols and other regulatory auditors
-
Safety Plan: Add the Stanley-Brown Safety Plan from the centralized documentation icon, which provides resources and guidance for making patients feel safe.
-
Infection Control and Informational Fact Sheets: Add the Universal Precautions for Infection Control consent form and the HIV/AIDS/TB/STD Informational Fact Sheet depending on your facility protocols.
-
Scheduling Follow-Up Appointments: Schedule a follow-up appointment as needed with a resource. Click here for more information on adding appointments to the Scheduler.
-
The patient will receive a notification by email or text that the appointment has been scheduled (depending on how you have set up the appointment communications). Click here to learn more about appointment communications.
-
The patient will receive a notification by email or text that the appointment has been scheduled (depending on how you have set up the appointment communications). Click here to learn more about appointment communications.
-
Referrals and Urgent Flags: If your facility cannot provide services to the patient, click here to learn more about referring the patient to a higher level of care.
-
You can add an urgent flag to the chart to notify all users that a follow-up or referral is needed. The flag is resolved once the risk has been mitigated and the client is safe or discharged to a higher level of care. Click here to learn more about adding a flag.
-
Best Practice Tools
Depending on the facility's needs, Kipu flags, statuses, and tags are used when adding identifiers for a risk. Facilities can use one or a combination of the following options depending on their unique requirements:
- Flags: We recommend notifying all users that documentation is necessary when they click on the patient’s chart.
- Statuses: It is best practice to use statuses with long-term notifications. The status is displayed in the dashboard, on rounds, and on the bed board (occupancy). Click here to learn more about patient statuses.
- Tags: Best used when a filter is needed for patients on the facesheet. Click here to learn more about patient tags.
Comments
0 comments
Please sign in to leave a comment.